174 lines
7.7 KiB
Markdown
174 lines
7.7 KiB
Markdown
|
|
# 调度器 cache 快照遗漏部分信息导致 pod pending
|
|||
|
|
|
|||
|
|
## 问题背景
|
|||
|
|
|
|||
|
|
新建一个如下的 k8s 集群,有3个master node和1个worker node(worker 和 master在不同的可用区),node信息如下:
|
|||
|
|
|
|||
|
|
| node | label信息 |
|
|||
|
|
|:----|:----|
|
|||
|
|
| master-01 | failure-domain.beta.kubernetes.io/region=sh,failure-domain.beta.kubernetes.io/zone=200002 |
|
|||
|
|
| master-02 | failure-domain.beta.kubernetes.io/region=sh,failure-domain.beta.kubernetes.io/zone=200002 |
|
|||
|
|
| master-03 | failure-domain.beta.kubernetes.io/region=sh,failure-domain.beta.kubernetes.io/zone=200002 |
|
|||
|
|
| worker-node-01 | failure-domain.beta.kubernetes.io/region=sh,failure-domain.beta.kubernetes.io/zone=200004 |
|
|||
|
|
|
|||
|
|
待集群创建好之后,然后创建了一个daemonset对象,就出现了daemonset的某个pod一直卡主pending状态的现象。
|
|||
|
|
|
|||
|
|
现象如下:
|
|||
|
|
|
|||
|
|
```bash
|
|||
|
|
$ kubectl get pod -o wide
|
|||
|
|
NAME READY STATUS RESTARTS AGE NODE
|
|||
|
|
debug-4m8lc 1/1 Running 1 89m master-01
|
|||
|
|
debug-dn47c 0/1 Pending 0 89m <none>
|
|||
|
|
debug-lkmfs 1/1 Running 1 89m master-02
|
|||
|
|
debug-qwdbc 1/1 Running 1 89m worker-node-01
|
|||
|
|
```
|
|||
|
|
|
|||
|
|
## 结论先行
|
|||
|
|
|
|||
|
|
k8s的调度器在调度某个pod时,会从调度器的内部cache中同步一份快照(snapshot),其中保存了pod可以调度的node信息。
|
|||
|
|
|
|||
|
|
上面问题(daemonset的某个pod实例卡在pending状态)发生的原因就是同步的过程发生了部分node信息丢失,导致了daemonset的部分pod实例无法调度到指定的节点上,出现了pending状态。
|
|||
|
|
|
|||
|
|
接下来是详细的排查过程。
|
|||
|
|
|
|||
|
|
## 日志排查
|
|||
|
|
|
|||
|
|
截图中出现的节点信息(来自用户线上集群):
|
|||
|
|
* k8s master节点:ss-stg-ma-01、ss-stg-ma-02、ss-stg-ma-03
|
|||
|
|
* k8s worker节点:ss-stg-test-01
|
|||
|
|
|
|||
|
|
1. 获取调度器的日志
|
|||
|
|
|
|||
|
|
这里首先是通过动态调大调度器的日志级别,比如,直接调大到`V(10)`,尝试获取一些相关日志。
|
|||
|
|
|
|||
|
|
当日志级别调大之后,有抓取到一些关键信息,信息如下:
|
|||
|
|
|
|||
|
|

|
|||
|
|
|
|||
|
|
* 解释一下,当调度某个pod时,有可能会进入到调度器的抢占`preempt`环节,而上面的日志就是出自于抢占环节。 集群中有4个节点(3个master node和1个worker node),但是日志中只显示了3个节点,缺少了一个master节点。所以,这里暂时怀疑下是调度器内部缓存cache中少了`node info`。
|
|||
|
|
|
|||
|
|
2. 获取调度器内部cache信息
|
|||
|
|
|
|||
|
|
k8s v1.18已经支持打印调度器内部的缓存cache信息。打印出来的调度器内部缓存cache信息如下:
|
|||
|
|
|
|||
|
|

|
|||
|
|
|
|||
|
|

|
|||
|
|
|
|||
|
|

|
|||
|
|
|
|||
|
|

|
|||
|
|
|
|||
|
|
可以看出,调度器的内部缓存cache中的`node info`是完整的(3个master node和1个worker node)。
|
|||
|
|
|
|||
|
|
通过分析日志,可以得到一个初步结论:调度器内部缓存cache中的`node info`是完整的,但是当调度pod时,缓存cache中又会缺少部分node信息。
|
|||
|
|
|
|||
|
|
## 问题根因
|
|||
|
|
|
|||
|
|
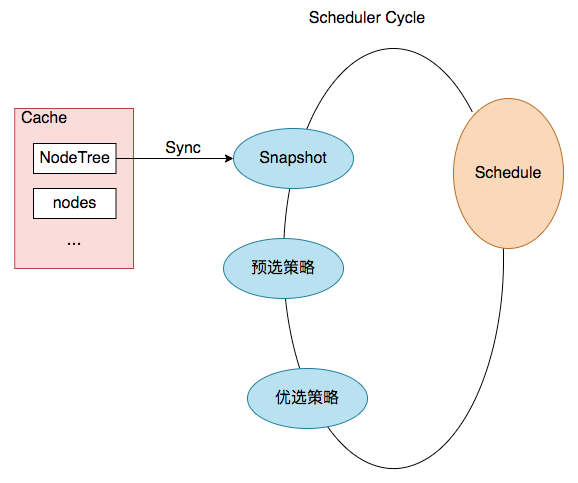
在进一步分析之前,我们先一起再熟悉下调度器调度pod的流程(部分展示)和nodeTree数据结构。
|
|||
|
|
|
|||
|
|
### **pod调度流程(部分展示)**
|
|||
|
|
|
|||
|
|
|
|||
|
|
|
|||
|
|
结合上图,一次pod的调度过程就是一次`Scheduler Cycle`。在这个`Cycle`开始时,第一步就是`update snapshot`。snapshot我们可以理解为cycle内的cache,其中保存了pod调度时所需的`node info`,而`update snapshot`,就是一次nodeTree(调度器内部cache中保存的node信息)到`snapshot`的同步过程。
|
|||
|
|
|
|||
|
|
而同步过程主要是通过`nodeTree.next()`函数来实现,函数逻辑如下:
|
|||
|
|
|
|||
|
|
```go
|
|||
|
|
// next returns the name of the next node. NodeTree iterates over zones and in each zone iterates
|
|||
|
|
// over nodes in a round robin fashion.
|
|||
|
|
func (nt *nodeTree) next() string {
|
|||
|
|
if len(nt.zones) == 0 {
|
|||
|
|
return ""
|
|||
|
|
}
|
|||
|
|
numExhaustedZones := 0
|
|||
|
|
for {
|
|||
|
|
if nt.zoneIndex >= len(nt.zones) {
|
|||
|
|
nt.zoneIndex = 0
|
|||
|
|
}
|
|||
|
|
zone := nt.zones[nt.zoneIndex]
|
|||
|
|
nt.zoneIndex++
|
|||
|
|
// We do not check the exhausted zones before calling next() on the zone. This ensures
|
|||
|
|
// that if more nodes are added to a zone after it is exhausted, we iterate over the new nodes.
|
|||
|
|
nodeName, exhausted := nt.tree[zone].next()
|
|||
|
|
if exhausted {
|
|||
|
|
numExhaustedZones++
|
|||
|
|
if numExhaustedZones >= len(nt.zones) { // all zones are exhausted. we should reset.
|
|||
|
|
nt.resetExhausted()
|
|||
|
|
}
|
|||
|
|
} else {
|
|||
|
|
return nodeName
|
|||
|
|
}
|
|||
|
|
}
|
|||
|
|
}
|
|||
|
|
```
|
|||
|
|
|
|||
|
|
再结合上面排查过程得出的结论,我们可以再进一步缩小问题范围:nodeTree(调度器内部cache)到`snapshot.nodeInfoList`的同步过程丢失了某个节点信息。
|
|||
|
|
|
|||
|
|
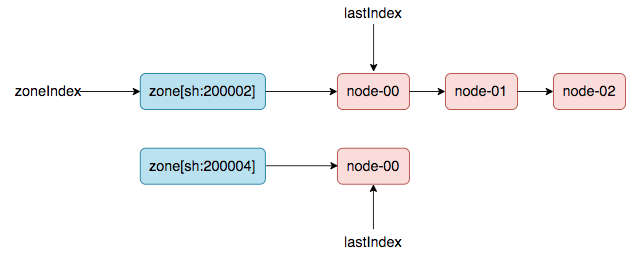
### nodeTree数据结构
|
|||
|
|
|
|||
|
|
(方便理解,本文使用了链表来展示)
|
|||
|
|
|
|||
|
|
|
|||
|
|
|
|||
|
|
### 重现问题,定位根因
|
|||
|
|
|
|||
|
|
创建k8s集群时,会先加入master node,然后再加入worker node(意思是worker node时间上会晚于master node加入集群的时间)。
|
|||
|
|
|
|||
|
|
第一轮同步:3台master node创建好,然后发生pod调度(比如,cni 插件,以daemonset的方式部署在集群中),会触发一次nodeTree(调度器内部cache)到`snapshot.nodeInfoList`的同步。同步之后,nodeTree的两个游标就变成了如下结果:
|
|||
|
|
|
|||
|
|
`nodeTree.zoneIndex = 1, nodeTree.nodeArray[sh:200002].lastIndex = 3,`
|
|||
|
|
|
|||
|
|
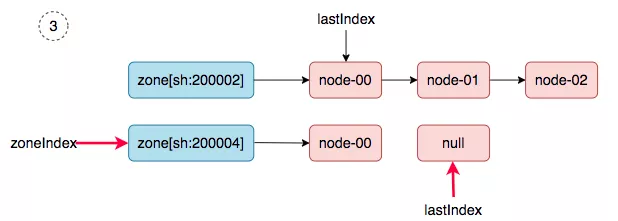
第二轮同步:当worker node加入集群中后,然后新建一个daemonset,就会触发第二轮的同步(nodeTree(调度器内部cache)到`snapshot.nodeInfoList`的同步)。
|
|||
|
|
|
|||
|
|
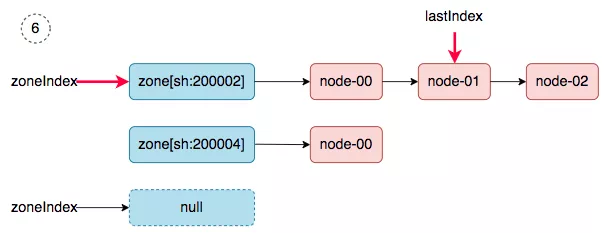
同步过程如下:
|
|||
|
|
|
|||
|
|
1. zoneIndex=1, nodeArray[sh:200004].lastIndex=0, we get worker-node-01.
|
|||
|
|
|
|||
|
|

|
|||
|
|
|
|||
|
|
2. zoneIndex=2 >= len(zones); zoneIndex=0, nodeArray[sh:200002].lastIndex=3, return.
|
|||
|
|
|
|||
|
|

|
|||
|
|
|
|||
|
|
3. zoneIndex=1, nodeArray[sh:200004].lastIndex=1, return.
|
|||
|
|
|
|||
|
|
|
|||
|
|
|
|||
|
|
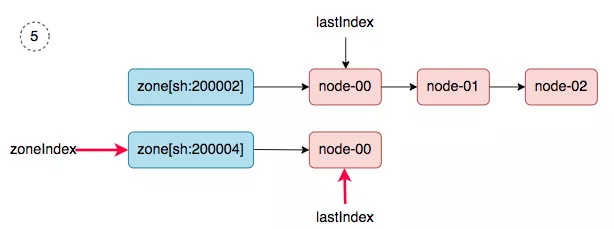
4. zoneIndex=0, nodeArray[sh:200002].lastIndex=0, we get master-01.
|
|||
|
|
|
|||
|
|

|
|||
|
|
|
|||
|
|
5. zoneIndex=1, nodeArray[sh:200004].lastIndex=0, we get worker-node-01.
|
|||
|
|
|
|||
|
|
|
|||
|
|
|
|||
|
|
6. zoneIndex=2 >= len(zones); zoneIndex=0, nodeArray[sh:200002].lastIndex=1, we get master-02.
|
|||
|
|
|
|||
|
|
|
|||
|
|
|
|||
|
|
同步完成之后,调度器的`snapshot.nodeInfoList`得到如下的结果:
|
|||
|
|
|
|||
|
|
```json
|
|||
|
|
[
|
|||
|
|
worker-node-01,
|
|||
|
|
master-01,
|
|||
|
|
worker-node-01,
|
|||
|
|
master-02,
|
|||
|
|
]
|
|||
|
|
```
|
|||
|
|
|
|||
|
|
master-03去哪了?在第二轮同步的过程中丢了。
|
|||
|
|
|
|||
|
|
## 解决方案
|
|||
|
|
|
|||
|
|
从`问题根因`的分析中,可以看出,导致问题发生的原因,在于nodeTree数据结构中的游标zoneIndex 和 lastIndex(zone级别)值被保留了,所以,解决的方案就是在每次同步SYNC时,强制重置游标(归0)。
|
|||
|
|
|
|||
|
|
## 参考资料
|
|||
|
|
|
|||
|
|
* [相关 issue](https://github.com/kubernetes/kubernetes/issues/97120)
|
|||
|
|
* [相关pr (k8s v1.18)](https://github.com/kubernetes/kubernetes/pull/93387)
|
|||
|
|
* [TKE 修复版本 v1.18.4-tke.5](https://cloud.tencent.com/document/product/457/9315#tke-kubernetes-1.18.4-revisions)
|